INT-1111: Module 2: Lab Zero
Instructions
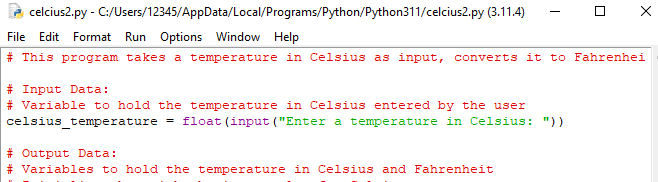
Develop a Python program to convert a temperature in Celsius to Fahrenheit, and then display the temperature in Celsius and the temperature in Fahrenheit.
Input:
- A temperature in Celsius, entered at the keyboard.
Example:
- Enter a temperature in Celsius: 0
Process:
- Set up the formula to do the conversion
Output:
- Display the temperature in Celsius and the temperature in Fahrenheit.
Example:
- The temperature in Celsius is 0.
- Once converted to Fahrenheit, the temperature is 32.
Temperature in degrees Fahrenheit (°F) = (Temperature in degrees Celsius (°C) * 9/5) + 32.
The Lab Zero.pdf
(Problem #9) provides the formula needed to do the conversion.
Requirements
- Use repl.it to create your solution (in Python).
- Submit your repl.it program link with all appropriate comments for your program.
- You need to set up a Python solution that is complete and workable.
For your solution to be complete, you must:
- prompt the user for the input data (a temperature in Celsius)
- set up a correct formula to process the input data, arriving at the output data
- provide the output (the temperature in Celsius and the temperature in Fahrenheit).
For your solution to be workable:
- Your solution should be free of any type of errors (syntax, run-time, logic)
- You may want to develop an algorithm first, using pseudocode or flowchart
- You do NOT need to turn in any algorithm
Instructions on documenting your solutions:
- Prior to the start of your solution, include a paragraph of Python comment lines, explaining what is being accomplished. (3 points)
The material in Chapter 2 includes information on how to do program documentation. Within your solution, include the following 3 sections:
- Input Data: document variables used to hold input data (2 points)
- Output Data: document variables used to hold output data (2 points)
- Processing: document the formulas/equations you set up as part of your processing (2 points)
Grading Rubric:
| Documentation | 9 points |
| Solution complete and working properly | 16 points |
| Solution not working (programming errors) | 8 points |
| Inputting not done according to the specifications | -3 points |
| Missing input item | -4 points |
| Missing output item | -4 points |
| Processing is done incorrectly | -4 points |
Answer Preview: INT-1111: Module 2: Lab Zero
$25.00