Project 1: Remote Access Controls
In Project 1, we will explore aspects of built-in protective controls inside the Windows OS and Linux OS. As you progress through this project, please remember to use your Virtual Machine IP Addresses and username/password during the lab. Commands may not work if your copy/paste.
Part 1 Windows Firewall and Access Restrictions:
In part 1 of this lab, you will create a user account called “Student1”. This account will be used to test and validate access restrictions to the Windows VM in the lab.
- Open the MARS dashboard and connect to the VPN
- Ensure that you start your Windows and Linux VM and note the IP addresses of your VM’s
- Once your Windows VM is finished starting, use the RDP client on your computer to connect to the Windows VM
- Enter your credentials from the MARS dashboard for you Windows VM
- Once connected and logged in navigate to the search icon and search for Computer Management.Take NoteThere are several ways to navigate to the “Computer Management” App. This is one of them and you should feel free to use whatever method you feel most comfortable with.
- Once you have opened the Computer Management App navigate to the “Local Users and Groups” menu item and expand the menu item
- When you have the Local Users and Groups menu item expanded select “Users”
- When the Users menu item is selected right click in the window and select “New User”
- You will see a new window open and you will enter in the following information
- Username = Student1
- Password = Student 1!@#
- Select “Create” when you have finished entering the User name and Password and select close

- Once the New User dialog box is closed review the list of users and ensure that you can see the new user “Student1
In the next set of steps, you will add the Student1 user to the remote access group. This will provide permissions for this user to RDP to your Windows VM. Pay close attention to the video. Some common issues you may run into here is if you do not spell the name of the new user correctly or if you did not follow the above steps correctly. If you cannot see the user you created, please re-watch the “Create Local User Account Video” BEFORE you contact your professor.
- In the Computer Management window select the “Groups” menu item
- In the middle section of the Computer Management window select “Remote Desktop Users” menu item
- Right click on the Remote Desktop Users menu item and select “Add to Group” and a new window will open.Take NoteAs mentioned before there are several different ways to do things in Windows. This is an example of one way, please feel free to use whatever method you are comfortable with.
- In the “Remote Desktop Users Properties” Window you will select “Add” at the bottom left of the window. A new window will appear for you to select the user you want to add to this group.
- Type in the user name Student1 and select “Check Names.” You should see a window that loock similar to the one below showing the user name Student1

- When you find the user Student1, select “OK”, “Apply”, and “OK” continue to the next step
Now that a new user has been created and added to the Remote Desktop Users group, it is time to test access. Log out of your Windows VM and return to your computer’s RDP window. From there, connect to your Windows VM and log in with the Student1 user credentials you created in Step 1. Once you log in, you should see a different desktop background than when you log in with your lab account. This will serve as evidence that you are logged in with a different account. If you can’t log in, please take a look at Steps 1 & 2 to make sure you are using the correct account and that the Student1 user is in the remote access group is in the remote access group. You can explore what access you have to the Student1 account on the Windows VM.
- Disconnect from the Windows VM
- Connect to the Windows VM and login using your newly created Student1 account
- Select “Ok” on the initial screen that provides legal and privacy noticesTake NoteIt may take some time to some time to login. Please be patient. You should see a new desktop like the one shown below.

- Once you are logged in you can go to the search icon and open the command prompt.
- You can enter in the command “whoami” to identify the user you are now logged in as.Take NoteYou will see the command “whoami” in multiple videos. This is a great command to use to demonstrate what user you are logged in as.
- Feel free to browse around in the desktop if you like. Once you are done log out of your Windows VM.

Step 4. Once you have explored the Windows VM with the Student1 account, please sign out of the Windows VM.
In the next section of this lab, we want to remove access for Student1 on the Windows VM. Follow the steps in the video to remove remote access for Student1. Sign back into the Windows VM with your lab access account and remove the Student1 user from the Remote Desktop Users group, log out of the Windows VM, and try to log back in with the Student1 user account to validate that the Student1 user account no longer has access. You should see an error message when trying to log in with the Student1 account. Your error message may look slightly different depending on the operating system you are using on your computer.
- Sign back into your Windows VM with your administrator account from the MARS Dashboard.
- You will follow the same steps previously used to create the Student1 user account.
- Search for Computer Management
- Select “Local Users and Groups”
- Expand the “Groups” menu item
- Select the “Remote Desktop Users”
- In the new windows select the “Student1” user account and then select remove

- Select “Apply” and then “Ok”
- You can disconnect from your Windows VM RDP session and try and log in as your Student1 user again. You should not be able to log in as the Student1 user because the user account has been removed from the group that has permission to RDP to your Windows VM. You should see a message similar to the one below.

For the next section of the lab, you will review and explore the Windows Firewall service and some of its features. Please be aware that you may unintentionally lock yourself out of your Windows VM during this section. Please review the provided video carefully and if you do end up locking yourself out your professor can re-provision your Windows VM for you.
- Log into your Windows VM
- Use the search feature to locate “Windows Defender Firewall with Advanced Security”Take NoteThere are several ways to search for the Windows Firewall service. As mentioned, before you can do this in whatever way you are comfortable with.
- Select the Windows Defender Firewall and expand the window
- Take a moment to review the main window here and review what the Windows Defender Firewall service provides
- Next select “Inbound Rules” from the left and menu window

- You will now see a long list of all inbound rules that allow or deny traffic to your Windows VM. In this step search for the SSH service. The video will show you one method of doing this by sorting the Local Port column.
- Select the inbound rule for “OpenSSH SSH Server” (Local Port 22) and select the “Properties” menu item on the right-hand side.
- The OpenSSH SSH Server inbound rule properties window will now be open. Please take a few minutes to explore the options that are in the properties window.
- Once you are finished exploring the various options in the properties window select the “Scope” tab.
- In the Scope tab under the “Remote IP Address” section select the “These IP Addresses option and then click “Add”
- In the IP Address window enter in the IP of Your Linux VM.Take NotePlease DO NOT use the IP from the video, you need to use the IP Address of your Kali Linux VM.
- Select “Ok” then select “Apply”
- Minimize your Windows Defender Firewall window
- Once you have entered in your Linux VM IP into the inbound rule and selected “Ok” and “Apply,” connect to the Linux VM from the VNC desktop icon on the Windows VM Desktop
- Open the Terminal Windows by going to Applications -> Usual Applications -> System Tools -> MATE Terminal
- Type in the following command to SSH to your Windows VMssh –l Administrator [enter in your Windows VM IP]Take NoteThe command has a lower-case letter L and you need to type the IP address of YOUR Windows VM.
- When prompted, enter your Administrator password for your Windows VM
- Once you connect you will see a screen similar to the below screen capture

- Type in the “Whoami” command to validate the user you are logged in as. You can feel free to enter other Windows command to validate your access.
- Once completed type exit to return to the Kali Linux command prompt
- Next you will enter the below commend to connect via SSH with the Studen1 user account and perform the previous steps to verify what access the Studen1 user account has.ssh –l Student1 [enter in your Windows VM IP]Take NoteRemember the password you created for the Student1 account on your Windows VM. Also please be sure to use YOUR Windws VM IP and note the IP used in the video.
- Now that we have validated that the Administrator and the Studen1 accounts can SSH from the Kali Linux VM to the Windows VM we will remove that access and test to ensure that access has been removed. Minimize your VNC window for Kali Linux.
- Go back to the Windows Defender Firewall application and select the inbound rule
- Find the OpenSSH SSH Server rule and select the properties
- From the properties Window select the Scope tab
- You will add in a new IP address of 10.10.10.10 and remove the IP you entered for the Kali Linux VMTake NoteThis step is purely to validate the function of the Windows Defender Firewall to only allow explicitly allowed IP addresses to connect via SSH.
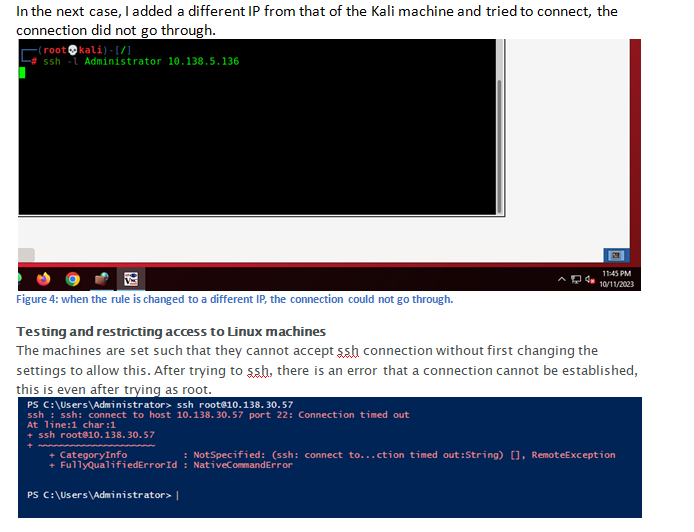
- Go back to your Kali Linux VNC Window and attempt to SSH to the Windows VM with the Administrator and the Student1 account. You will see a similar result to the screenshot below.

The next section of this lab will move to testing and restricting access to Linux machines. Each Linux variant has nuances to doing this. For this lab, we will be focused on Kali Linux, but you are encouraged to look at other Linux OSs to see how to enable or disable these features.
- On your Windows VM open the Powershell application
- Enter in the below command to connect to the Kali Linux VM over SSH
- Type in the word “Yes” when prompted to continue the connectionTake NoteYou will see a prompt to accept the SSH Key of the Kali Linux VM. This will only happen once, unless you need to rebuild your Windows VM.
- You should see a Permission denied message because Kali Linux is not accepting SSH connections
- Next enter the command below to attempt to connect as the “root” user.Take NotePlease remember that Linux is case sensitive. The Root user and the root user are two different users. The account you use for your Kali Linux VM is the root user with the lower-case letter R.
- You will notice that the message still shows an access denied message. This is because the root account is not authorized to connect via SSH

- Use the VNC application to connect to your Kali Linu VM
- In this next step we need to allow user login over SSH. By default, Kali Linux does not allow this so we need to modify the sshd config file to allow remote login to Kali Linux. The file location is in the video and in the screenshot below

Take Note
Your professor used the application called vi as seen in the video and the screenshot above. Kali Linux come with several different file editing software that can be used. Read more information on how to use vi.
If you are interested in seeing the file modification using the file editing tool called nano see the video below and you can look at the Nano Editor Beginner Guide.
- Using either Nano or Vi open the file /etc/ssh/sshd_config
- Using the arrow keys on your keyboard, arrow down until you see the two following lines in this filePermitRootLogin yes&PasswordAuthentication no
- You want to edit the file so both lines read yes
- If you are using vi, as shown in the video, you must press the I (lowercase letter I) key to enter text. If you are using Nano you can simply hit the backspace key and erase the word and type in yes.
- If using vi select “ctrl c” and then the colon key and the letter w then the leter q “:wq” to save the file. If using Nano type “ctlr x” the letter y to save then the enter key to save the same file name that you edited
- Next enter the command “systemctl restart ssh” this will cause the ssh service to restart and read the file that you just edited.
- Now that the file has been edited, go back to the PowerShell window on your Windows VM and try to ssh with the root account again
- You should see a response similar to the one below. Enter the whoami command to validate you are the root user

- Now that we validated, we can SSH to the Kali Linux machine from the Windows VM we want to add the Student1 and validate that that user can also SSH. Go back to your Kali Linux VM.
- Enter the command “adduser student1”Take NoteLinux is case sensitive and user account only have lowercase letters.
- Follow the onscreen menu and enter in the password “Student 1!@#”, re-enter the password, fill in the Full Name and any of the other fields you wish. Note that not all fields and needed and you can press the enter key to skip entering data in the fields.
- Enter in the letter Y to save your changes
- Enter in the command systemctrl restart ssh to restart the ssh service
- Go back to the PowerShell window on your Windows VM and try to connect to the Kali Linux machine over SSHTake NoteThe login response from the Linux VM will appear different than when you logged in as the root user. This is normal and expected.

In the next section of this lab, we will explore using IPTables to restrict access to the Linux VM. IPTables is the Linux Firewall, and there are many different applications you can use in Linux that x that overlay the IPTables application. As mentioned before, it is easy to make a mistake here and lock yourself out of your Linux VM. Please read the steps and watch the demonstration video carefully.
- Go to your Linux VM and open the MATE Terminal
- Enter the command “sudo iptables –L” This will show a list of the current IPTables
- Go back to the PowerShell application on your Windows VM and SSH to the Kali Linux VM to validate you are still able to SSH
- Type in “exit” to close the SSH session
- Go back to your Kali Linux VM and enter the below command. Please take care to follow the exact letter case of the command.sudo iptables –A INPUT –p tcp –dport 22 –j DROP

- Re-enter the command sudo iptables –L to show that your new rule is in the INPUT rule set. This rule is going to drop any connect on port 22 from anywhere.

- Go back to the PowerShell screen on the Windows VM and attempt to SSH to the Kali Linux VM. If you have done this correctly you will not be able to connect over SSH
- Now go back to the Kali Linux VM and remove the IPTables rule with the command “sudo iptables –D INPUT 1”
- Enter the command “sudo iptables –L” to view the list of iptable rules to validate your rule is removed.
- Go back to the PowerShell window on your Windows VM and attempt to SSH to the Kali Linux VM. If you enter the commands correctly you should be able to connect.
© 2023 University of Maryland Global Campus
All links to external sites were verified at the time of publication. UMGC is not responsible for the validity or integrity of information located at external sites.
Answer Preview: Remote Access Controls