Unit 4 Assignment: Project 2 Part B: Performing a Penetration Test
Instructions
Perform the following exercises in MARS, the virtual learning environment. Follow the steps in each exercise, taking screenshots as you go along and inputting the information and documentation in a Word document using the template provided in the submission instructions.
Lab Setup: Setting up Vulnerable FTP Service
To facilitate penetration testing and enhance our understanding of security vulnerabilities, you will intentionally install a vulnerable version of FTP on our Ubuntu machine. Please note that this step is optional. If you want, you can skip ahead to the penetration test.
Instructions
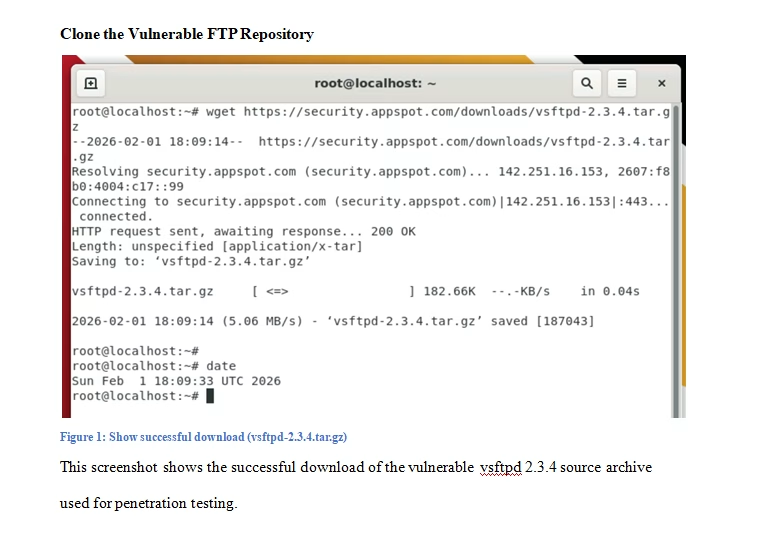
- Proceed with the installation of a vulnerable FTP service by cloning the following GitHub repository:
git clone https://github.com/vulnerable/ftp.git

- Next, set up the necessary packages to establish a built environment. Specifically, install ‘build-essential’, which encompasses all essential components for compiling basic software written in C and C++. Execute the following command to install “build-essential”:
- cd vsftpd-2.3.4-infected.git
- sudo apt-get install build-essential

- Before initiating the build process, make a slight modification to the “Makefile” by adding “-lcrypt” to the “LINK” flag. Access the “Makefile” for editing using the “nano” text editor:
nano Makefile

- After making the necessary changes to the “Makefile”, simply execute the following command: root@UBUNTU:~/Downloads/vsftpd-2.3.4# make

- Upon successful execution of the command, you’ll observe a binary file named “vsftpd” generated in the current directory.

- Before executing the generated binary, you need to set up some prerequisites. Create a user named “nobody” and a directory named “empty”. On Ubuntu, the user “nobody” is typically available by default, but if not, you’ll create it.
sudo useradd nobody
sudo mkdir /usr/share/empty
- To proceed, you need to copy the executable file and the configuration files to their respective directories for the application to run properly.
sudo cp vsftpd /usr/local/sbin/vsftpd
sudo cp vsftpd.8 /usr/local/man/man8
sudo cp vsftpd.conf.5 /usr/local/man/man5
sudo cp vsftpd.conf /etc
- To set up anonymous access to the FTP server, you’ll create a directory and add it to the user configuration.
sudo mkdir /var/ftp/
useradd -d /var/ftp ftp

- To add a rule to allow traffic on port 21 (FTP) to the INPUT chain of the iptables firewall on the Ubuntu server, you can use the following command:
sudo iptables -A INPUT -p tcp –dport 21 -j ACCEPT

- To enable local user login in vsftpd, you need to uncomment the “local_enable” line in the vsftpd configuration file (/etc/vsftpd.conf). Here’s how you can do it:
Open the vsftpd configuration file for editing:
sudo nano /etc/vsftpd.conf

- Now start the vsftpd service by using the following command:
sudo /usr/local/sbin/vsftpd

Exercise 1: Penetration Testing
Objective: Perform a rigorous penetration test on a structured virtual network environment, designed with intentional vulnerabilities.
Instructions
For this lab, you’ve been tasked by the University of Maryland to conduct a penetration test on their internal network and web application. This is a grey box approach, meaning you have limited knowledge of the network and application architecture.
Machine Details:
- Ubuntu Machine:
- IP Address: 10.11.14.86
- Windows 10 Machine:
- IP Address: 10.11.14.85
Web Application Details:
- Application: OWASP Juice Shop
- URL: OWASP Juice Shop
Your objective is to assess the security posture of the network and the OWASP Juice Shop web application, identify vulnerabilities, and provide recommendations for remediation.
- To perform network enumeration using Nmap, follow these steps:
- Open a terminal on your Kali Linux machine.
- Use the following command to scan the network and gather information about hosts and open ports:
└─# nmap -sC -sV 10.11.14.86 10.11.14.85 -oN pentest.txt


- The nmap scan has been completed, revealing two hosts with several ports and services open. Now, it’s time to delve deeper into enumeration. First, let’s focus on port 21. According to the nmap output, the FTP port is open on the .86 machine, and fortunately, anonymous FTP is enabled! We’ll connect to the FTP port from our attacker machine (Kali) and explore to see if we can uncover any valuable information.

- You should have successfully logged in. It appears that the organization is not adhering to best practices. While you didn’t discover anything substantial within the FTP server, you can still classify this as a medium-level risk.

-
- Upon examining the nmap output, you’ve identified the FTP version as 2.3.4. Conduct a Google search to investigate if there are any exploits for this particular version of FTP.
- Remarkably, you’ve discovered that this version of vsftpd is susceptible to Command Execution. By following the links provided in the search results, you can learn how to exploit this vulnerability.
<liremarkably,></liremarkably,>

- Additionally, you can utilize Metasploit to search for exploits targeting this specific version. Start Metasploit from your Kali machine.


- You can also utilize the “searchsploit” tool, which is already available on our Kali machine, to search for specific exploits targeting applications.

- Now that you’ve learned multiple methods to discover exploits, proceed with exploiting this vulnerability using Metasploit, which offers an easy and convenient approach.
- search vsftpd 2.3.4

- use 0

- You only need to configure one option, which is to set the RHOSTS (remote host). In our case, it’s the IP address of the Ubuntu machine. Once you’ve configured this, you can simply type either “run” or “exploit” to initiate the exploitation of the target.
- set RHOSTS 10.11.14.86

- You’ve successfully gained access to the Ubuntu machine!
- exploit

- Now that you have full access to this machine, you can execute any commands you desire. Run a few commands to explore further. For example:
whoami; hostname
pwd
cat/etc/shadow
ip addr


- Above you can see you can run commands such as whoami, hostname, ip addr, and cat /etc/shadow. The output of the commands shows you are root, and you can even see the hash of the users. At this point, you fully compromised the Ubuntu machine.
- Stop your pentest here, and document all your findings and report to your client. Take your time and perform the same steps on the Windows 10 machine and see if there are any known vulnerabilities that can be exploited to gain access to the Windows 10 machine as well.
Excercise 2: Footprinting
Objective: Analyze a network of virtual machines to identify security weaknesses and potential breach points.
Instructions
Now, you’ll perform a pentest on their web application.
In the initial phase of web pentesting, start by thoroughly examining the website, understanding its purpose, browsing related forums for discussions, and extensively researching it using Google. The goal is to gather as much information as possible to inform our testing strategy and uncover potential vulnerabilities.
WHOIS
- Go to OWASP Juice Shop.
- Input the URL: https://juice-shop.herokuapp.com/#/.


- By examining the WHOIS output, you can gather valuable information such as DNS details, email addresses, IP addresses, location, name servers, and more. This comprehensive data aids in understanding the domain’s infrastructure and ownership details.

DNS enumeration:
- For DNS enumeration, proceed under the assumption that Facebook is a partner, granting you permission to conduct a penetration test on their systems as well. This allows you to expand your scope and explore potential vulnerabilities within the Facebook domain. Limit your attacks to the lab’s scope, and adhere to the bug bounty program’s guidelines. Utilize DNS Dumpster for DNS enumeration to collect information within the authorized scope.


- You have been presented with a substantial amount of information. Please take your time to review it thoroughly. Additionally, you can utilize another tool called OSINT Framework, which is invaluable for information gathering. Feel free to explore the OSINT Framework.

- Since the scope of your web application penetration test was limited to information gathering, you will conclude the assessment at this stage and prepare to present your findings to the client.
Exercise 3: Documentation Requirements
Objective: Document the findings and vulnerabilities uncovered during the penetration testing process.
Instructions
- Document all commands executed, logs generated, and relevant system activities.
- Capture screenshots of critical steps, observed alerts, events, and configuration changes made during the testing process.
- Ensure thorough documentation of created files, usernames, backdoors, and any other modifications made to the system.
- After documentation is complete, securely delete any created files, and remove any backdoors to maintain system integrity.
Revised Key Findings:
- Provide a summary of the key findings from each exercise, detailing the outcomes of the penetration testing activities.
- Describe the effectiveness of the grey box approach and the limited knowledge of the network and application architecture in identifying vulnerabilities.
- Reflect on the experience of efficiently triaging and cataloging cyber-attacks using specialized tools, highlighting successful mitigation strategies and areas for improvement.
- State how penetration testing is related to business continuity planning. Justify your response with examples and citations.
Exercise 4: Effective Strategies and Countermeasures
Objective: Compose effective strategies and countermeasures to reinforce the security of the network based on the penetration test results.
Instructions
Based on your Unit 4 Discussion and your work performed in the Unit 4 Assignment, state the strategies and countermeasures to reinforce the security of the network based on the penetration test results.
Tutorial for Performing a Penetration Test