Hands-on Instructions: Network Access Controls
Project 2 picks up from the firewall discussion in Project 1. However, in this project we focus on the Linux firewall: IPTables. There will be more discussion about the Windows Firewall in later labs. In this lab, we explore some more advanced features of IPTables. First though, we want to understand the various components of IPTables.
To begin, connect to the Kali VM in MARS. After you are logged into the VM, follow the steps below. As always, ensure you document your work through good notetaking and screenshots throughout. You’ll need both to complete the Report after you finish.
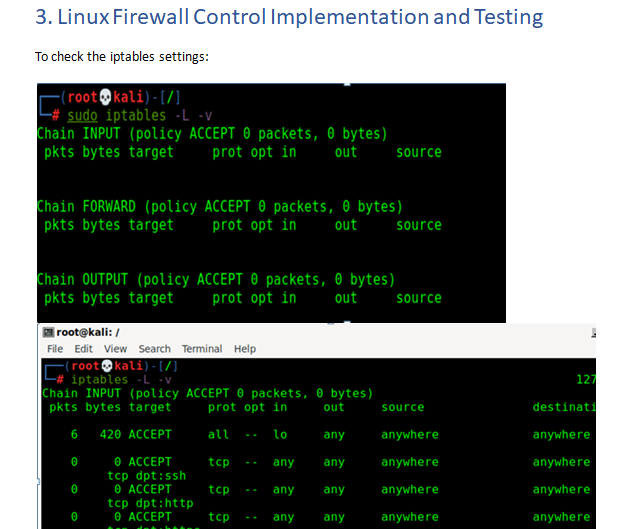
- Check the status of your current iptables configuration by running: sudo iptables -L –vHere, the -L option is used to list all the rules, and -v is for showing the info in a more detailed format. Below is the example output:Chain INPUT (policy ACCEPT 0 packets, 0 bytes)
pkts bytes target prot opt in out source destination
Chain FORWARD (policy ACCEPT 0 packets, 0 bytes)
pkts bytes target prot opt in out source destination
Chain OUTPUT (policy ACCEPT 0 packets, 0 bytes)
pkts bytes target prot opt in out source destinationNotice that all chains are set to ACCEPT and have no rules. This is not secure since any packet can come through without filtering. - Defining a rule means appending it to the chain. To do this, you need to insert the -A option (Append) right after the iptables command, enter the command belowiptables –A
- You will notice there is an error stating that the “-A” requires an argument and there is a suggestion to try “iptables -h” to display the help screen. Enter the “iptables -h” command and explore the help menu. For reference, here is the basic structure of the iptables rules.
- -i (interface) — the network interface whose traffic you want to filter, such as eth0, lo, ppp0, etc.
- -p (protocol) — the network protocol where your filtering process takes place. It can be either tcp, udp, udplite, icmp, sctp, icmpv6, and so on. Alternatively, you can type all to choose every protocol.
- -s (source) — the address from which traffic comes from. You can add a hostname or IP address.
- –dport (destination port) — the destination port number of a protocol, such as 22 (SSH), 443 (https), etc.
- -j (target) — the target name (ACCEPT, DROP, RETURN). You need to insert this every time you make a new rule
- The next step here is to allow traffic on the local host. This may already be allowed, but this statement will enable the iptables to allow the traffic.iptables –A INPUT -I lo –j ACCEPT
- Enter the iptables –L command to see the new rule you created.
- Now enter the below commands to allow TCP ports 22, 80, and 443 and then list the IPTables again to view what is setup.iptables -A INPUT -p tcp –dport 22 -j ACCEPT
iptables -A INPUT -p tcp –dport 80 -j ACCEPT
iptables -A INPUT -p tcp –dport 443 -j ACCEPT
Iptables –L -v
Next, we want to add a deny statement that will deny all traffic that is not explicitly allowed. This step can be dangerous because you could deny your VNC connection to your Kali VM. Since we have allowed and ssh connection you should be able to ssh to the Kali VM if you make a mistake in the next few steps. We want to see what existing ports the Kali Linux VM is using. We need to open NMAP on the Windows VM and perform a scan of the Kali VM.
- Go to the search menu and type “NMAP”
- Select the “Nmap – Zenmap GUI” from the search results
- In the window that opens enter the Kali VM IP in the “Targets” field
- Next in the Command field enter “nmap -Pn” This will perfom a quick scan of the Kali VM. Your results should look similar to the screenshot below

As you can see from the NMAP results we need to ensure TCP ports 3389, 5800, and 5900 are allowed before we enter our deny statement. Now there are a few different ways to accomplish this. You can simply enter these rules in order or you can leverage the rule line numbers as part of your command. Lets look at what line numbers have been assigned to our rule set
- Enter the command “iptables -L –v –line-numbers” and press enter. You should see something similar to the screenshot below

- Enter the following statements to allow your VNC trafficiptables -A INPUT -p tcp –dport 5800 -j ACCEPT
iptables -A INPUT -p tcp –dport 5900 -j ACCEPT - Now enter the below command to drop any traffic that is not explicitly allowed in our IPTableiptables -A INPUT -j DROP
- Now close your VNC window to your Kali Linux VM and try to connect again. If you are unable to connect, you will need to reset your Kali VM and start the lab over.
- If you have made it this far, you have not locked yourself out. We want to add one more rule here to ensure we enable access for port 3389. Enter the below command to add a new rule for tcp port 3389.iptables –I INPUT 4 –p tcp –dport 3389 –j ACCEPT
Now we have our IPTables setup the way we want, only allowing specific ports/protocols into our Kali Linux VM. Now we want to adjust a couple of the rules to only allow traffic from our Windows VM.
- In your Kali VM enter the below command to modify the rule for SSH to only allow SSH traffic from the Windows VM.ptables –R INPUT 2 –s [enter the IP of your Windows VM] -p tcp –dport 22 –j ACCEPT
- Now run the below command to list the IPTables to ensure you command was entered corectly.iptables –L –line-numbers
In this next section, we will review different combinations of responses you can send to external computers trying to connect. We will work with the ICMP protocol as it is simple to test and will provide you with a more in-depth view of the iptables capabilities.
- Enter in the following command to add your ICMP rule in position number 2Iptables –I INPUT 2 –p icmp –j ACCEPT
- Now we want to add in a rule in postion number 3 to deny icmp from our Windows VM. Enter the following commandIptable –I INPUT 3 –p icmp –s [enter Windows VM IP] -j DROP
- Attempt to ping your Kali VM from your Windows VM. Did your pings make it through? If yes, why? If not, why?
- Your ping traffic should not have been blocked because there is an allow statement before the deny statement. In order to achive what we want, we need to modify the rules to put the deny rule above the allow rule. There are a few different ways to accomplish this, but we will use the below steps.
- Enter in the below command to delete the ICMP allow ruleIptables –D INPUT 2
- Next enter in the command below to insert the allow statement after the deny statementIptables -I INPUT 3 –p icmp –j ACCEPT
- Now try to ping the Kali VM again to test this.
© 2023 University of Maryland Global Campus
All links to external sites were verified at the time of publication. UMGC is not responsible for the validity or integrity of information located at external sites.
Answer Preview: Network Access Controls