Project 6: Wireless Networking, Enable DHCP services
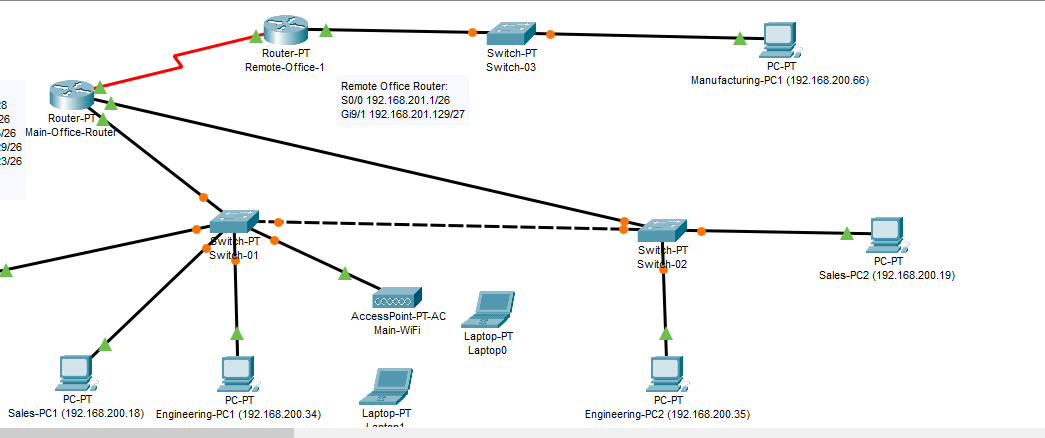
In this project, you will add wireless capability to your packet tracer network. You will add a Server and enable DHCP services to support automatic addressing on the wireless devices. Use the Packet Tracer Custom Addressing plan created in Project 3 to complete portions of this activity. Load your Project 3 packet tracer file, save the file with a new name: SAVE your Packet Tracer file as follows: finitial-lname-section-project-4 i.e., fflintstone-itt116TR100A-project-4 Figure 12 Example Completed Project Project 6 – Instructions: Refer to the custom address plan you designed in Project 3: Add a DHCP Server. 1. Add a server to the main office, connect it’s ethernet interface to a switchport that is assigned to VLAN 1. 2. Configure an IP address and default gateway using an available address from the subnet you assigned to VLAN 1. Page 18 of 33 Add DHCP Services. Configure default scope 3. Set ‘serverPool’ to provide DHCP addressing for VLAN1. • Set the address range according to the address plan. • Set subnet mask for address range. • Set default gateway for address range. • Set DNS for network. • SAVE the serverPool scope. Figure 13 Example Default DHCP scope 4. Add a new scope for the wireless network. Using the subnet you designated for Main Office Wireless, add a new DHCP scope: 5. Configure a new DHCP scope / pool using a new IP subnet. • Limit the DHCP range (Maximum Users) as needed to the number of addresses available in the subnet minus 1. • Set the default gateway for the subnet. (Remember, this is the default gateway for the subnet/vlan, so pick an appropriate address from your planning template. You will use this address again to configure the router.) • Name the new scope ‘Main-WiFi’ and use the ADD button to save it. Page 19 of 33 Figure 14 Example Wireless DHCP Scope Configure Switch-01 with a Wireless Vlan. 6. Add three new NM-1CGE interface modules to Switch-01. • Place one in slot 3, one in slot 6, one in slot 7. 7. Add a new VLAN to the Switch-01. • Assign port Gi3/1 to vlan 20 • Assign port Gi6/1 to vlan 20 On the main router: 8. Add NM-1CGE interface modules for VLAN 1 and VLAN 20. 9. Configure Gigabit 7/0 for VLAN 1. • Apply an IP Address and mask for VLAN 1. 10. Configure Gigabit 6/0 for the Wireless VLAN. • Apply an IP address & mask from the new wireless subnet (selected earlier) to the interface. • Configure an IP helper (a.k.a. DHCP relay) that will provide relay services to the DHCP server you added to the main office (it’s in VLAN 1…). • In INTERFACE configuration mode. ip helper-address where the server address is the address of the DHCP server. • CONNECT Gigabit 6/0 on main router to Gigabit6/1 on Switch-01 using an appropriate cable. • CONNECT Gigabit 7/0 on main router Gigabit7/1 on Switch-01. Page 20 of 33 Add a Wireless network: 11. Add a Wireless Access point to the main office. (See Appendix A: Sample Devices.) • Use the AP-PT-AC device. • Configure Port 0 settings for Auto-Duplex and Auto-Bandwidth. • Connect it to Switch-01 using a switchport that is assigned to VLAN 20. • Set a Wireless SSID ‘Main-WiFi’. • Set a WPA-2 passphrase of ‘Main-PassPhrase’. 12. ADD two laptops with wireless adapters to the main office. • Place them in the general proximity of the WAP. o Remove of the ethernet interface. o Install an 802.11AC compatible Wi-Fi adapter. o Remember to power off the laptop to accomplish this task. 13. Configure each laptop for network access. • Locate the ‘Config’ Tab, and the Wireless0 interface. o Configure the correct SSID and Passphrase for Main-Wi-Fi. TEST your work: • Verify that each laptop receives an IP address from the DHCP pool assigned to your wireless subnet. • Verify that each laptop is able to ping other devices on the network. • Hint: VLAN 20 consists of three ports. If you encounter problems testing your work, consider adding a PC configured with a static address from VLAN 20 to verify connectivity to other VLANs. • You may need to update static routing in the remote office. Project 6 – Scoring (30 points total): Add & Configure Wireless Network devices: 5 points Add DHCP Server & configure scopes: 10 points Add IP Helper: 5 points Add & Configure VLAN 1 & 20: 5 points Network functions properly: 5 points Page 21 of 33 Project 6 – Complete and submit your work SAVE your Packet Tracer file as follows: finitial-lname-section-project-6 i.e., fflintstone-itt116TR100A-project-6 ZIP the file – keep the name intact. i.e., fflintstone-itt116TR100A-project-6.zip SUBMIT the completed packet tracer file as a ZIPPED file to the assignment page in the digital classroom. Screenshots are not acceptable
Answer Preview: Project 6: Wireless Networking, Enable DHCP services