ITT-116 Project 2 – Install Windows Guest OS (for Windows)
Select the guide that corresponds with your operating system (Windows or Macintosh) needs. Follow the instructions provided in the guide.
Windows Guest Operating System (OS) installation – vmWorkstation 15.x
Description:
This project includes activities to configure your vmWorkstation for Windows to accept a Windows Operating System load, install the Windows 10 Operating System, and configure the OS for use in various portions of your course.
Load the version of Windows as specified by your instructor.
Before you begin:
Complete the ‘Project 1 – Install Virtualization Solution’ assignment, create your Virtual Machine installation folder, and configure your virtual network switch prior to completing this activity.
Obtain the Windows Operating system ISO image file(s) as directed by your instructor. The ISO file should be kept in your ‘Downloads’ folder and retained for future use.
Obtain the License Key for the selected Windows OS (Azure software instructions). Record the key. You will use this key each time you install this OS.
If you are installing Microsoft Visio, obtain the ISO image file (Azure Education Software) and record its license key prior to starting the application installation.
Creating a new Virtual Machine – 5 points
| Start vmWorkstation. |
|
Navigate to ‘File’ on the main menu.
Select ‘New Virtual Machine’. |
|
|
The New Virtual Machine Wizard is displayed.
Select ‘Custom’, then click ‘Next’. |
| Hardware Compatibility
Leave at default, then click ‘Next’. |
|
|
Guest Operating System Installation Select ‘I will install the operating system later’.
Click ‘Next’. |
| Guest Operating System
Select OS class, Version For Windows 10 – Select ‘Windows 10 X64’. Click ‘Next’. |
|
|
Name the Virtual Machine. Select something meaningful for the course.
Be sure the location folder is on a drive with sufficient free space to support at least 20GB more than disk options required by your OS (For Windows 10, at least 80GB free).
Click ‘Next’. |
| Firmware Type: Select BIOS. Click ‘Next’. | |
|
Processor Configuration
Select a minimum of 2 Processors with 2 cores per processor.
Click ‘Next’. |
| Memory Configuration
Select a minimum of 2048 MB.
Click ‘Next’. |
|
|
Network Type:
Select ‘Use network address translation’.
Click ‘Next’. |
| I/O Controller Types
Select ‘LSI Logic SAS’.
Click ‘Next’. |
|
|
Virtual Disk Type: Select “NVMe’. Click ‘Next’. |
| Select a Disk
Select ‘Create a new virtual disk’. |
|
|
Specify Disk Capacity
Select ‘60.0 GB’.
Select ‘Store virtual disk as a single file’.
Click ‘Next’. |
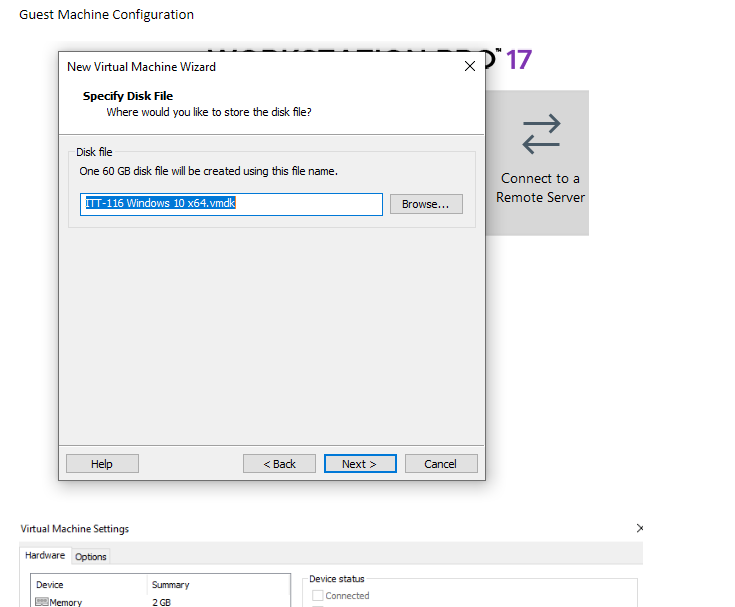
| Specify Disk File
Select the default name.
Click ‘Next’. |
|
|
Ready to Create Virtual Machine
Select ‘Customize Hardware’. |
| Hardware Select ‘Add’. | |
|
Add Wizard
Select ‘Network Adapter’. |
|
| Select ‘Custom’.
Then select ‘GCU- Airgap’.
(Created earlier) |
|
|
Select ‘New CD/DVD’. |
| Change connection to
‘Use ISO Image File’. Select ‘Browse’. Browse to the folder where the desired ISO image file is stored. |
|
|
Select the desired ISO image file.
Click ‘Open’. |
| Select ‘Printer’. Click ‘Remove’. | |
|
Click ‘Close’, then click ‘Finish’. |
Your new virtual machine is ready to start the OS installation process.
Click ‘Finish’.
Your new Virtual Machine is displayed as a window in the workspace.
Submit a screenshot of the virtual machine settings as evidence of activity completion.
Installing the Operating System – 15 points
| Install the operating system.
Select ‘Power on this virtual machine’. |
|
|
The OS installation process starts automatically. |
| Select default Setup options.
Click ‘Next’. |
|
|
Click ‘Install now’. |
| Setup starts. | |
|
Select ‘I don’t have a product key’. |
| Navigate the OS version list.
Select ‘Windows 10 Pro’.
Click ‘Next’. |
|
|
Click ‘I accept the license terms’.
Click ‘Next’. |
| Select ‘Custom’. | |
|
Click ‘Next’. |
| Installation progress | |
|
Installation progress |
| Installation progress | |
|
Installation restart |
|
Getting Ready! |
|
| Restarts |
|
Options
Unless otherwise noted, accept the default options.
Click ‘Yes’. |
| Click ‘Yes’. | |
|
Click ‘Skip’. |
| Important stuff going on in the background.
Feel free to take a sip of water, stand up, stretch.
The system will reward your patience. |
|
|
Just a moment |
| Set up for personal use. | |
|
***IMPORTANT***
Select ‘Offline Account’. |
|
| Select
‘Limited Experience’. |
|
|
Set a user name. Click ‘Next’. |
| Set a password. Click ‘Next’. | |
|
Confirm the password.
Click ‘Next’. |
| Choose Security questions, provide answers.
(Hint: Keep them simple.)
Click ‘Next’. |
|
|
Click ‘No’. |
| Decline. | |
|
Disable ALL options. Click ‘Accept’. |
| Getting Ready again | |
|
This might take several minutes.
Don’t turn off your PC. |
Welcome to Windows
Submit a screenshot of the Welcome to Windows prompt as evidence of activity completion.
Installation completed.
Concludes installation.
Install vmTools – 5 points
| Install vmWare tools following OS installation | |
| During Installation: | |
|
|
|
|
Tools Setup Restart Guest Click ‘Yes’. |
Submit a screenshot of this prompt as evidence of activity completion. |
Activate Windows
| Right click the Start Menu. | |
|
Select the ‘Settings’ gear. |
|
|
Windows Settings
Click the ‘Activate Now’ Link (Circled). |
| Update & Security | |
|
Enter your product key (obtained from Azure software during product download).
Click ‘Next’. |
|
Activation Success! |
Cleanup Activities
Cleanup Tasks
NOTE: Shutdown the OS guest for these changes. Change VM settings.
| Edit virtual machine settings. | |
|
Set CD/DVD to ‘Use Physical Drive’. Click ‘Ok’. |
|
|
Return to normal operation! |
Enable Host Folder Sharing – 5 points
| Explanation: | Using VM Tools, the system allows the Guest OS to access HOST file folders
directly in the Guest. This is a handy feature allowing the user to move files between host and guest systems. The folders appear as a network mapped drive in the Windows Guest. This activity enables host folder sharing with the guest. The operation must be completed on each guest individually. |
|
Virtual Machine Settings
Edit the virtual machine settings. |
| Options
Select the ‘Options’ tab. |
|
|
Options
Select the ‘Shared folders’ item.
Select ‘Always enabled’.
Click ‘Add’. |
| Add Shared Folder
Wizard. Click ‘Next’. |
|
| Browse folders
Locate the desired folder on the host system. |
Hint: Recommend creating a folder in your user ‘Documents’ folder, then sharing that folder. |
| Add Shared Folder Wizard.
Host Path and Share Name.
Confirm the Host Path.
Name the folder. Click ‘Next’. |
|
|
Add Shared Folder Wizard.
Check ‘Enable this share’. Click ‘Finish’. |
| Options Confirmation | |
|
Start the virtual machine and login to the system.
Navigate to File Explorer.
Locate ‘This PC’. Expand the folders. Locate ‘Shared Folders’.
Display the folders. |
|
| Test the sharing by copying some files between the systems. | |
| Submit a screenshot of the shared folder list to demonstrate completion of this activity. | |
Scoring (30 points total):
- Guest Machine Configuration – 5 points
- Guest OS installation – 15 points
- vmTools installation – 5 points
- Host Folder sharing – 5 points
ITT-116 Project 2 – Install Windows Guest OS (for Windows)
ITT-116 Project 2 – Install Windows Guest OS (for Windows)