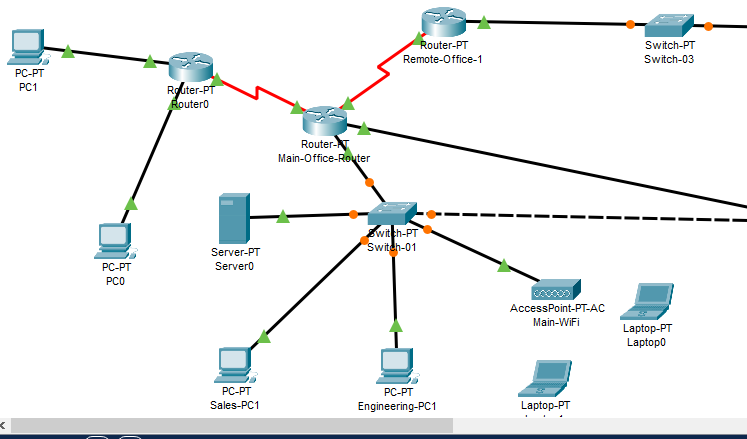
In this project, you will apply previously practiced concepts to your project file. You will add custom subnet scopes to the DHCP server, reconfigure each PC to use DHCP addressing, reconfigure routers to support DHCP relay services for each VLAN, and add a third remote site with supporting VLANs, custom subnets, devices, and routing. Load your Project 4 packet tracer file, save the file with a new name: SAVE your Packet Tracer file as follows: finitial-lname-section-project-5 i.e., fflintstone-itt116TR100A-project-5 Figure 15 Example Completed Project Page 22 of 33 Project 7 – Instructions: Add a DHCP Server Scopes. Use the custom subnet address plan you created in Project 3 as a reference. • Create a new DHCP scope (on the server you created in Project 4) for EACH VLAN / Network in the network. (Hint: you should have at least 3 including Wireless.) • Be sure to add/save each scope with a unique name. • Set the values for the: ▪ Default Gateway ▪ Correct subnet mask ▪ Correct maximum addresses available ▪ Starting host address – (Consider which addresses are ‘static’) i.e., for a network defined as 172.31.10.62/26: Network ID = 172.31.10.62 Mask = 255.255.255.192 Gateway = 172.31.10.63 Starting IP = 172.31.10.64 (why??) Limit 60 users Configure IP helper services for Main Office for each subnet/VLAN. • Add the IP helper address (of the DHCP server) to EACH ethernet network interface on the main-office router ip helper-address
Add Serial interface module to Main Office. • Add NM-1SS module to Slot 1. • Assign IP address (192.168.255.5 255.255.255.252). • Enable the interface. Configure IP Helper services for Remote Office 1. Add the IP helper address to EACH network interface on the Remote Office 1 router. ip helper-address Reconfigure Remote Office 1 PCs for DHCP. • Update Static routing to include the VLAN 1 network in the main office. • Remove any static address settings from each PC. Page 23 of 33 Add an additional Remote Office location: Add layer 3 devices. • Add a new Router-PT. o Add and enable Serial (NM-1SS) interfaces. o Add and enable Gigabit interfaces (2). o Connect the serial interface to Main-Office-Router. • Configure interfaces. o Assign address to Gigabit per address plan. o Configure an IP helper address on each Gigabit interface. o Assign address to the serial interface (192.168.255.6 255.255.255.252). • Enable routing • Add static routing entries to the main office and remote office 1 networks. Add access layer devices. • Add a new Switch-PT-Empty. o Add Gigabit interfaces (2). o Add FastEthernet interfaces (2). • Configure Layer 2. o Assign each Gigabit interface to the correct VLAN. o Assign each FastEthernet interface to the correct VLAN. • Enable Layer 1. o Connect each Gigabit interface to its corresponding interface on the Remote Office 2 router. • • Install access devices. o Add one PC to each VLAN. o Configure each PC to use DHCP for addressing. TEST your work: • Verify that each laptop and PC receives an IP address from the correct DHCP pool. • Verify that each laptop and PC is able to ping other devices on the network. Page 24 of 33 Project 7 – Scoring (40 points total): Add & Configure additional remote site: 10 points Add & Configure additional interfaces (main site): 5 points Add & Configure additional VLANs 5 points Configure additional DHCP scopes: 5 points Re-configure PCs for DHCP: 5 points Network functions properly: 10 points Project 7 – Complete and submit your work SAVE your Packet Tracer file as follows: finitial-lname-section-project-7 i.e., fflintstone-itt116TR100A-project-7 ZIP the file – keep the name intact. i.e., fflintstone-itt116TR100A-project-7.zip SUBMIT the completed packet tracer file AND your completed address planning template as a ZIPPED file to the assignment page in the digital classroom. Screenshots are not acceptable.Expert Answer: Advanced DHCP, Additional Wide Area Networking